| This is a Guide page. This means the page will walk you through a specific task, strategy, or enemy/boss fight. |
| Type | Boss |
|---|---|
| Environment | Floating Island |
| AI Type | The Star Scouter AI |
| Damage | 40 / 80 |
| Max Life | 8,000 / 10,000 |
| Defense | 12 |
| KB Resist | 100% |
| Immune to |
| Coins |
|---|
- Item (Quantity)Rate
- One of the following 7 items will be dropped
- 14.29%
- 14.29%
- 14.29%
- 14.29%
- 14.29%
- 14.29%
- 14.29%
- 10%
- 10%
 Treasure Bag(The Star Scouter)
100%
Treasure Bag(The Star Scouter)
100%
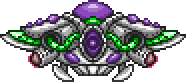
The Star Scouter is a Pre-Hardmode boss available in the Thorium Mod, summoned by using a Star Caller around Floating Island heights. It is often considered the hardest boss in the Thorium Mod before entering Hardmode, but can be fought before Skeletron if one knows what they are doing. The following are some hints, tips, and strategies to help defeat it.
Terrain Preparation[ | ]
Due to the nature of the fight's environment, it is incredibly difficult to fight this boss without an arena. However, because this is how the boss is meant to be fought, it can be a more thrilling fight if you do it on a Floating Island with very few platforms to assist you. There are a few reasons why it would be much easier to fight this boss on a platform though – the main one being that one of its attacks summons extra projectiles when it hits a solid block. The optimal arena would be a long platform in the sky, with two platforms below you in case you need to dodge something. In addition, vertical pillars of platforms will allow you to dodge using a Grappling Hook, but seeing as how the boss will likely remain over your head for most of the fight, it is best not to make such an escape often.
As usual, Campfires, Heart Lanterns, Sunflowers, and Stars in Bottles will always be a good addition to the arena, as well as some Mistletoe, which grants similar effects to the others. You can get Mistletoe at any time of the year by means of the Holiday's Greeting. If you have already defeated Skeletron, setting up a few Heart Statue stations connected to Timers could easily help.
Some people want to take the Scouter closer to ground levels to grant better maneuverability. This would be fine; however, due to the solid-block issue mentioned earlier, it is not the optimal solution. Using platforms lower to the ground could benefit you, though, especially without a Lucky Horseshoe or similar.
Gearing Up[ | ]
Armor[ | ]
Several classless armors can be used in this fight if they suit your needs better than class-focused armors. Steel armor is the bare minimum you should consider as it has about as much defense as some other choices but also grants the set bonus of 10% decreased damage taken. Crimson armor is an incredible choice if you want better life recovery options. Flight armor is a decent choice, but the Scouter will likely stay above you, making it less optimal to use the air to dodge. In most cases, you'll want a more useful armor set in terms of defense or damage output. If you have already defeated Skeletron, Granite armor can occupy the leggings slot of a Wizard set or Malignant armor, which can more than double the defense of these armor sets. It also does not provide any downgrade to movement speed until you put on the full set. However, as a classless armor, Granite is not recommended due to the movement speed decrease. Darksteel armor is also a great post-Skeletron set due to its movement speed buffs and dash abilities being useful for dodging. Its armor penetration and immunity to knockback also making it a great well-rounded set.
As a Warrior, Molten armor and Shadow armor are both very solid choices, as always. The former gives you great damage output combined with solid defense, and the latter gives you movement speed bonuses which will be highly vaulable for the fight, especially considering it is much harder to fight this boss with Hermes Boots or their upgrades on. Danger armor is a good choice pre-Skeletron, especially as it means that you can much more easily tank the fire lasers that the Scouter Cores put out. However, it only makes you immune to that one debuff out of the three the cores can inflict. Magma armor can be great for damage output as a warrior, and is also a very well-rounded pick.
If you are using Ranged weapons, Yew Wood armor and Tide Hunter armor are both good picks; however, the latter's critical strike set bonus does nothing due to slow-down effects not working on bosses. The Yew Wood armor is also much more suited for the fight due to the increased firing speed and mini-crits. Necro armor also has a good damage bonus, but is not much better than Yew Wood despite being locked behind Skeletron. The defense increase of 4 points compared to Yew Wood may be useful against the Scouter, so it is still worth consideration.
A Mage will have the best luck creating their own custom set using a Wizard Hat, a Diamond Robe, and either a pair of leggings from a different magic armor like Meteor or Jungle armor, or a high-defense pair of leggings from Granite armor or Molten armor. A Silk Hat can stand in for the Wizard one, as it grants 2 flat damage to any magic weapon used and stacks with Ring Accessories. This is best used with the Meteor Leggings for an additional 7% damage increase. Bulb armor, Malignant armor with high-defense or magic-boosting leggings, Meteor armor with the vanilla helmet and Jungle armor are also good choices against the boss. Bulb armor can be a particularly good choice due to the maximum life increases and the spore clouds.
Summoners should use Spirit Trapper armor or the Meteor armor with the Meteor Mask to fight the boss depending on which stage the player is at when they fight it. However, as they have two different set bonuses, it should be noted that the Meteor Mask focuses more on direct damage with the plasma-based attacks, while the Spirit Trapper armor is good at keeping you alive with its bonuses to healing that it provides. Bee armor will also work for the encounter, but should be avoided unless you have yet to fight Skeletron and need the extra minion.
If you are a Thrower, Fossil armor and Bronze armor can be used. The latter is exceptionally good for throwers, but the former's lack of defensive capabilities leave something to be desired. Therefore, a Thrower should also consider armors like Crimson armor or Flight armor due to the extra defense and still-useful set bonuses if fighting the boss pre-Skeletron.
Healers can consider using Templar armor post-Skeletron, or Iridescent armor before him.
Bards should use Noble armor against the boss, as it provides the best overall bonus for the class by that stage of the game.
Accessories[ | ]
While nearly every other fight requires Spectre Boots or similar speed-increasing boots, this time they can actually be detrimental to your performance because staying directly underneath the Scouter is the best technique to dodge it. Mana-Charged Rocketeers are amazing for movement in the air, but that might not be necessary if the arena is set up right. The best option is to use a Yellow or White Horseshoe Balloon as your only method of vertical movement for the fight. The Lucky Horseshoe, when added to the accessory, makes the fight easier to tolerate considering the heights you are fighting it at. The Champion's Wings could also be great for vertical movement, but again, unnecessary. The Shield of Cthulhu is also incredibly useful to avoid certain attacks while moving horizontally.
In terms of good offensive accessories, The Ring or another Ring accessory can be incredibly useful to gain additional damage or damage reduction. If you have already defeated the Granite Energy Storm in Expert Mode, the Eye of the Storm is a very useful accessory to use as it can keep a reliable source of damage and Granite Surge onto the boss. A Shark Tooth Necklace is also incredibly useful for weaker weapons to bypass the boss's defense. A Crietz can provide a few extra hits on the boss, especially if you are using a weapon such as a Yoyo that can go inside the enemy's hitbox.
In terms of good defensive accessories, a Cobalt Shield or similar knockback-preventing accessory can be incredibly useful if you have already fought Skeletron first. Accessories that provide damage reduction, such as the Worm Scarf, can significantly improve your survivability in the battle. The Potion Chaser is a great weapon to use to recover, as it adds an extra 15 health onto any healing item, including Potions or the Cook's food.
| Guides | ||
|---|---|---|
| Pre-Hardmode Bosses | ||
| Hardmode Bosses | ||
| Classes | ||
| Crafting | ||